Before I expose the "real" stuff around the Cottage-in-the-Making ... I'll share more pictures of projects that have been in process for several years. Yes, years. When working with a shoe-string budget ... it takes patience. That's the part I dislike the most ... waiting. BUT ... in the waiting process (waiting for $ ... waiting for time ... waiting for hubby to complete something I have no idea how to do!) ... by the way did I share with you how much I LOVE THAT MAN. He puts up with a lot ... I'm not kidding you ... a lot. He has taught me how to wait patiently for things ... I've often said ... my husband is PAINFULLY patient.
Sorry ... I digressed.
But you'll get used to me sharing about my hubby --
he is awesome :O)
Sometimes waiting to finish a project allows for creativity! Seriously ... this is a must ... layering a room is crucial. Believe me ... if there's anyone who wants it RIGHT NOW ... it is Gina Miller. I am all about immediate gratification. But "flipping" things (like furniture or a whole room) takes time.
So how do you layer a room?
Start with the bones of your room ...
Structure
(flooring, ceiling, walls, windows)
Lighting
(electrical work might be needed to increase lighting in a dark space)
Moldings
(base molding, door molding, windows, crown, chair rail, wainscoting, paneling)
Paint Color
(this takes a long time for me ... it has to be just right! Find something that inspires you (pottery, fabric, etc.) ... this will keep you focused!
Accessories
(this layer can change w/ taste over time or seasonally :O)
________________________________________
How do you start? Cut out pictures in magazines (or start an inspirational notebook on-line with http://www.blogger.com/www.houzz.com and focus your attention on those spaces or ideas that trip your trigger! FOCUS! This is where I can fall apart easy ... there are so many wonderful ideas swimming in my head ... I really have to narrow in on what is good for our cute, little cottage and what is doable in the budget!
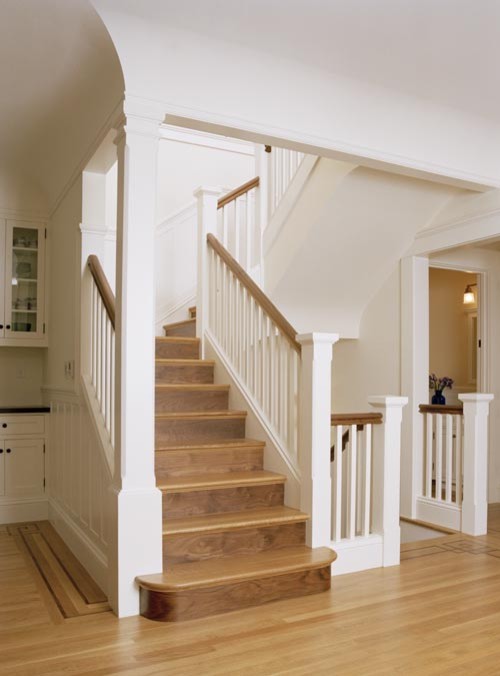
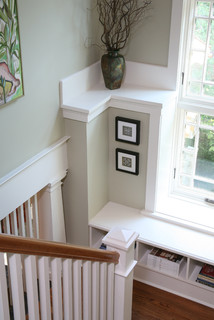
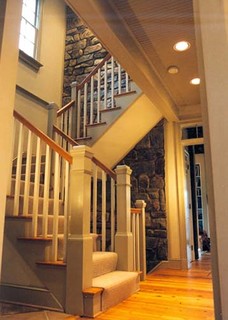
Okay ... so when we decided to open up the stairs to the basement ... I said to myself, "the stairs need to be amazing!" I know ... weird. But really ... look at homes that are striking to the eye ... they have beautiful trim work ... and that trim work includes stairwells that make you stop and breathe slow!
________________________________________
Here are a few examples ...


Okay ... now I need to take a moment and breathe slow
... breathe slow Gina.
Aren't those inspirational pics lovely? Oh my.
-----------------------------------------------------------------
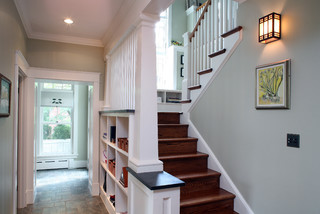
The picture below became my focus for the project.
No kidding.
(I apologize that it's a picture of a catalog page from the contractor who made the stairs)
This was it.
Not only did we want to make the basement feel like the main
part of the house ... we wanted the base of the stairs to feel like it
WASN'T in a basement.
Did we compromise with this design-element in mind?
Yes.
The trade-off was space ...
...in order to achieve the "look" ...
we lost some usable space...
but it was WORTH IT!!!

Remember when I talked about boxed newel posts in yesterday's post? I was fueled to do a little research ... finding out everything about stair case posts ... then I found out how much they cost. Yikes!
Sooooooooo ... plan B went into gear.
I think our final outcome was a close 2nd.


 Note to self ... share how I flipped the above
entertainment center into a lovely linen
closet for storage AND it doubles as a wardrobe
for when my mom visits from southern Georgia :O)
Hubby lovingly leveling each sons' artwork in the new playroom/media room :O)


________________________________________
So this is where I want to stop sharing pics ...
there's a part of me that wants to deceive the reader in thinking
that the playroom/media room is complete BUT it isn't ...
NEWMAN!
It just looks a little ... blah.
 Wouldn't a sectional look great in this space?
There are two walls that I
did not
include in my "after" shots ...
they hold the
"wall of toys"
and the
"wall of tv/gaming/media stuff"!
I'll do a "flip" on the two walls that aren't done!
Then I can share with you some of my painting tips ... :O)
And maybe find a great deal on a sectional
from Craigslist.com ... yeah!
____________________________________________
happy decorating, my friend!