Hey y'all!
Just wanted to re-wind time a bit and share the step-by-step process of how we updated the lighting in our kitchen and gave the ceiling a much-needed makeover.
Months ago we hired a friend who happens to be an electrician and he re-vamped our kitchen lighting.
I smile every time I turn the lights on!
__________________________________
This is what we started with ...
see the old track lighting ... it was so dark in
our kitchen at night ... task lighting was definitely needed!
We found out from Tim (our electrician friend) that
these lights get hot ... and when they do they burn
the dust that sits on them if they aren't cleaned regularly!
We thought our 20-year-old lights were a fire hazard ...
in reality they were just dirty!
I'm so embarrassed!
So Tim got to work ...
... and put a whole grid of these in ...
and hubby got busy patching huge holes ...
and there was also a large beam running through the
middle of the kitchen that turned out to be
decorative (not weight-bearing) ... so out it came, too!
Thank goodness we didn't have to make the ceiling patch-work perfect ...
because we decided to cover it with this ...
Bead-board Paint-able Wallpaper
This product is amazing. It only costs $25 a roll. And on a project as big as this ... you gotta love that price!
We've put it in several places in our kitchen re-do ...
on the sides of the this cupboard
on the backside of the cupboard
as a back splash to the new desk area
and on the side of the lower cabinet ...
I've never done wall-paper and it was so easy-breezy!
Measure - Cut - Wet - Lay
______________________________
So ... back to the ceiling ...
in order to prepare the ceiling for the paint-able wallpaper
we had to roll on a product called sizing ... it helps prepare the ceiling for the paper and it allows it to be removed w/ease
(if ever this amazing ceiling ever becomes "dated")
Have you ever paid $ for something and found out it was
WELL WORTH EVERY CENT?!
I call the man in the following picture a
marriage saver
...
Brian Wood
the wallpaper guy!
He accomplished something in a couple of short hours that would have taken Dan and I days to do ... I am not kidding you ... Brian was worth every single cent. He did an amazing job and hubby and I celebrated that small investment fee by saving ourselves headaches, frustration and probably a few arguments!
:O)
After Brian left ... I started painting ...
and painted ...
and painted some more!
Painting ceilings are tough ... let alone a ceiling with a bead-board pattern ... oy!
I used Benjamin Moore's Decorator's White (the color of all our trim in the house and the color used on the kitchen cabinets) but instead of using a semi-gloss finish ... the ceiling paint sheen is satin.
Sheen is everything! Normally with a ceiling you want to use "ceiling paint" which has NO sheen ... actually kind of a negative sheen ... which allows no light to bounce off and ricochet across the room. But for this ceiling ... you want some light to catch those beautiful grooves in the bead-board. You want JUST ENOUGH sheen to draw the eye-upward ... but not too much that the sheen shows your imperfections (and believe me - there are plenty of those!).
Soooo ... satin was chosen.
I bit my nails before, during and after ... I wanted the sheen to be just right. I nailed it! It catches the light enough but not
too much. Yeah Yeah Yeah!
_______________________________
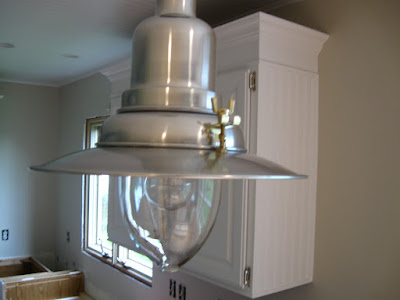
And finally the light above the new peninsula/eating area ...
(too bad my camera can't pick up the beauty in the new ceiling and the awesome light fixture)
 |
| you can find this here |
My original intent was to install 2 of these ...
But they were a bit pricey at $45 each ... plus, I was limited in space over the bar area and didn't want anything hum-drum ... then I saw this at IKEA ...
I got this puppy for only $27!
LOVE a deal!
Our poor lighting issue has been solved.
In fact, the lighting was SO good that when we first flipped the switch ... I saw how dirty my kitchen really was!
Oh my, now I have a new problem :O)
Do you have a space that you keep coming back to? Check out some of these tips here on how to tackle a room make-over. The biggest lesson I've learned it to be patient ... it's in the waiting time during the project that I find amazing deals ... deals that are either free or so much better than I had originally planned. There's always a reason why we have to wait ... look for those reasons ... there could be an amazing surprise waiting for you!
Hope you have a great Monday!


